A clean, stable ceiling adds value to a home. Cracked paint and sagging drywall can lead to structural issues that need repair. Water stains often point to plumbing, roofing, or HVAC problems that need fixing.
Depending on the type of damage, professional ceiling repairs can cost between $100 and $500. Some repairs are easy for homeowners, such as smearing spackling on a small crack. If you want to know more about ceiling repair visit Perth Insulation.
Drywall repair is a common problem in many homes and is generally within the skill set of most homeowners. However, if you encounter a crack that’s wider than 1/8″ or damage to a ceiling that sags from water damage or other problems, it’s best to call in the pros to ensure your safety and get the job done right.
Small holes and dents in drywall are easy to fix, usually with a simple spackle or lightweight joint compound. Using a putty knife, apply the compound to the hole, spreading it to the edges of the wall and “feathering” it so it blends with the rest. Alternatively, you can purchase a small pre-cut patch at most hardware stores for holes up to about 4″.
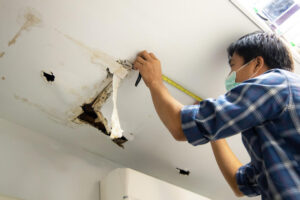
To fix a bigger hole in the ceiling, first, use a square or other straightedge to mark lines about one inch above and below the damaged area. This will help you make sure you cut straight across and aren’t too close to pipes or other structural beams. Using your drywall saw, carefully cut along these marks until you reach the studs on either side. Once you have a clean, flat patch, tape over the edges with paper tape and apply a few thin coats of joint compound, letting each dry before applying the next. The final step is lightly sanding the repaired area to ensure it’s smooth and prime it to match the surrounding wall.
Interior corner cracks are another common drywall issue that can occur in any home and are usually caused by lumber shrinkage and movement. Watch for these cracks near windows and doors, and be sure to repair them as soon as you notice them to prevent them from getting worse over time.
To repair a cracked interior corner, apply a drywall patch over the crack and then cover it with mesh joint tape to strengthen the joint, reduce movement, and minimize future cracking. Add a second layer of drywall compound over the tape, spreading it slightly from the patch and feathering it into the surrounding wall. Lightly sand the patch and the entire wall, then primer and paint to match the existing color.
Structural beam repair is a job that is best left to professionals who have the right tools and equipment. If you have a structural beam that is showing signs of failing, such as slanting floors or cracks in the walls, it is important to investigate and fix this problem quickly to prevent it from becoming worse.
The most common structural damage occurs from movement in the ground that supports the walls and floors of a building or subsidence. This can be caused by various factors, including ground erosion, shifting water tables, tree roots, soil shrinkage, heave, up-lift, salt attack, and more. These changes in the earth cause stress on the walls and floor structures, leading to cracking. The most effective method to repair these structural problems is using concrete or steel reinforcing methods.
If a support beam starts showing signs of failure, it may need to be replaced. If this is the case, it is a good idea to consult with an experienced contractor to ensure you are getting the most bang for your buck and that the replacement will be done properly.
Before replacing a beam, you must remove any pipes or wires currently going through it and make sure to turn off the water and power. Once that is completed, use a jack and temporary post to support the beam before you remove the old one. Once the jack is in place, use metal plates to secure the new post to the floor and ceiling joists. After that, toe-nail the new beam to each ceiling joist and the jack studs along the top of the beam.
When a lally column shows signs of failure, it can be repaired by bridging the column. A bridging technique uses steel shear studs that are welded to the intact portion of the web plate and then encased in Ultra-High Performance Concrete (UHPC). This allows the bearing forces to bypass the corroded section and keep the column structurally sound.
Mold is not just a cosmetic issue, as it can cause health problems and rot the structure of buildings. It also produces mycotoxin spores that cause severe headaches, coughing, sneezing, skin rashes, and even death in humans and pets when they are inhaled. So, when the first signs of water damage are seen, it is a good idea to call in a professional mold remediation and restoration team to get started right away.
Mold removal requires several steps to be done right, starting with finding the source of the leak and addressing it. Then, the team will remove contaminated materials and sanitize and dry areas using fans and dehumidifiers. If there are signs of moisture behind the walls, they will cut out drywall and insulation to find the extent of the damage. This is the only way to ensure that all spores are killed, as some species of mold, like black mold (Serpula lacrymans), require constant moisture to thrive, and if it is not removed correctly, the spores can be reintroduced into a home or office and start growing again.
Once all damaged drywall and other materials are removed, the team will use various techniques to kill any remaining mold spores. This can include sanding and vacuuming, but most importantly, the team will set humidity levels below the level required for mold growth. They will likely use fans and dehumidifiers to keep this setting in place so the area can be reoccupied without further mold spores being brought into the building.
Finally, the team will seal the cleaned wall surfaces with pigmented shellac or oil-based primer to prevent future mold problems. They will also repaint the surface with latex paint that contains mildewcide to prevent mold from growing on the wall further. This is the final step in ensuring that the moisture problem is fixed, and the team should return soon after to verify that all traces of mold have been eliminated. By doing this, the team can give their clients and tenants the peace of mind to know that they are safe to occupy their homes or offices once again.
Brown water stains on ceilings aren’t just an eyesore; they’re a sign of a serious problem. Left untreated, water stains can grow and cause structural damage that requires expensive repair. The best way to deal with water stains is to clean them as soon as you notice them and to take care of the underlying issue that caused them. While covering a water stain with paint may make it look better, the underlying problem will almost certainly come back and may get worse.
Before you tackle a water stain, test to see if it’s a water stain and not mold or mildew. To do this, apply a small amount of bleach to the affected area and wait about 15 minutes. If the stain disappears, it’s likely just a water stain; if it remains, you may have a more serious mold or mildew problem that needs to be addressed with professional help.
Start by cleaning the stained area with a homemade bleach solution. Mix one bleach with three parts water in a bucket and dip a sponge into it. Scrub the affected area with the sponge and rinse it when you’re done. Next, apply a stain-blocking primer to the ceiling (look for a product that says “stain block” or “stain sealant” on the label) and allow it to dry completely.
Once the primer has dried, you’ll be ready to repaint. Be sure to choose a color that closely matches the original ceiling shade. If you need clarification on the exact color, purchase a tester can and test it alongside your stain on scrap drywall before applying it to your ceiling.
It’s also important to understand that the most significant thing you can do for your home’s safety, value, and structure is to find and fix the source of a leaky ceiling. Even if you’ve cleaned and primed the water stains, they’ll eventually return if you don’t take care of the root cause. Taking steps to identify the source of a water leak will not only prevent the problem from occurring in the future, but it’ll also make any future ceiling repairs much easier.